Why Make This Recipe
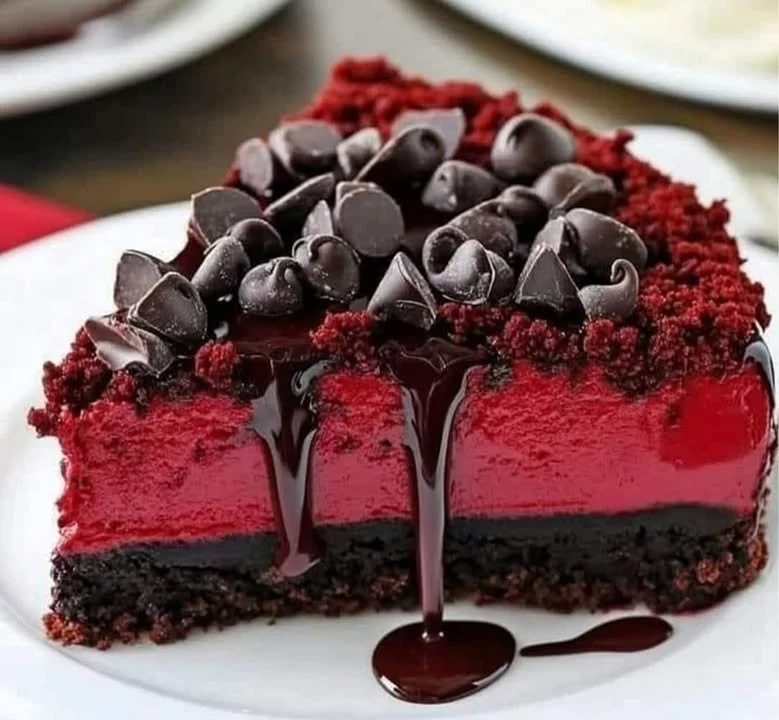
Red Velvet Cheesecake is a delightful dessert that combines the rich, velvety texture of classic cheesecake with the unique, striking look of red velvet cake. This recipe is perfect for special occasions, celebrations, or simply when you want to treat yourself to something sweet and delicious. The layers of fluffy red velvet and creamy cheesecake create a perfect balance of flavors that everyone will love.
How to Make Red Velvet Cheesecake
Ingredients
- 1 cup (125g) all-purpose flour
- 3/4 cup (150g) granulated sugar
- 2 tbsp unsweetened cocoa powder
- 1/2 tsp baking soda
- 1/4 tsp salt
- 1/2 cup (120ml) buttermilk
- 1/2 cup (120ml) vegetable oil
- 1 large egg
- 1 tsp white vinegar
- 1 tsp vanilla extract
- 1 tbsp red food coloring (liquid or gel)
- 2 (8 oz / 225g) blocks cream cheese, softened
- 1/2 cup (100g) granulated sugar
- 2 large eggs
- 1 tsp vanilla extract
- 1/4 cup (60ml) sour cream
- Whipped cream or cream cheese frosting (optional)
- White chocolate shavings or red velvet cake crumbs (optional)
Directions
- Preheat the oven to 325°F (160°C). Grease and line a 9-inch (23 cm) springform pan with parchment paper.
- In a bowl, whisk together the flour, sugar, cocoa powder, baking soda, and salt.
- In a separate bowl, mix the buttermilk, vegetable oil, egg, vinegar, vanilla extract, and red food coloring.
- Combine the wet and dry ingredients just until smooth. Set aside.
- In a large bowl, beat the cream cheese until smooth and creamy. Add sugar and mix until combined.
- Beat in the eggs, one at a time, then add vanilla and sour cream. Mix until velvety.
- Pour the red velvet batter into the prepared pan and smooth it out.
- Gently spoon the cheesecake batter over the top, spreading it carefully to cover evenly. The batters will stay in two layers as they bake.
- Bake for 50–60 minutes, or until the center is set and only slightly wobbly when jiggled.
- Turn off the oven, crack the oven door, and let the cake cool inside for 1 hour.
- Then refrigerate for at least 4 hours, preferably overnight.
- Before serving, top with whipped cream or a light layer of cream cheese frosting.
- Garnish with white chocolate curls, red velvet crumbs, or fresh berries for extra flair.
- Slice with a warm knife for clean, beautiful cuts. This cheesecake pairs wonderfully with coffee or a glass of milk!
How to Serve Red Velvet Cheesecake
Serve the Red Velvet Cheesecake chilled, topped with whipped cream or cream cheese frosting. Adding decorative garnishes like white chocolate shavings or fresh berries will make it even more appealing. This cheesecake is great on its own, but it also pairs well with coffee or a glass of milk for a delightful dessert experience.
How to Store Red Velvet Cheesecake
To store Red Velvet Cheesecake, cover it tightly with plastic wrap or aluminum foil and keep it in the refrigerator. It will stay fresh for up to 5 days. If you want to keep it longer, you can freeze it. Just wrap it in plastic wrap and then foil to prevent freezer burn. It can last in the freezer for up to 3 months.
Tips to Make Red Velvet Cheesecake
- Use room temperature cream cheese for a smoother texture.
- Make sure not to overmix the batter, as this can lead to cracks in the cheesecake.
- For cleaner slices, use a warm knife to cut through the cheesecake.
- Experiment with different toppings like fresh fruits, nuts, or chocolate drizzle for added flavor.
Variation
You can create a chocolate version of this cheesecake by adding melted chocolate to the cream cheese batter. Alternatively, try adding crushed nuts or a swirl of fruit puree for a fruity twist!
FAQs
1. Can I use a different food coloring?
Yes, you can use any red food coloring, whether liquid or gel, to achieve the desired color for the red velvet cake.
2. How long does this cheesecake take to bake?
The cheesecake takes about 50-60 minutes to bake, but be sure to keep an eye on it. The center should be set with just a slight wobble.
3. Can I make this cheesecake ahead of time?
Absolutely! In fact, it’s best to let it chill in the refrigerator for at least 4 hours, or overnight, to achieve the best texture and flavor.


Leave a comment