
Why Make This Recipe
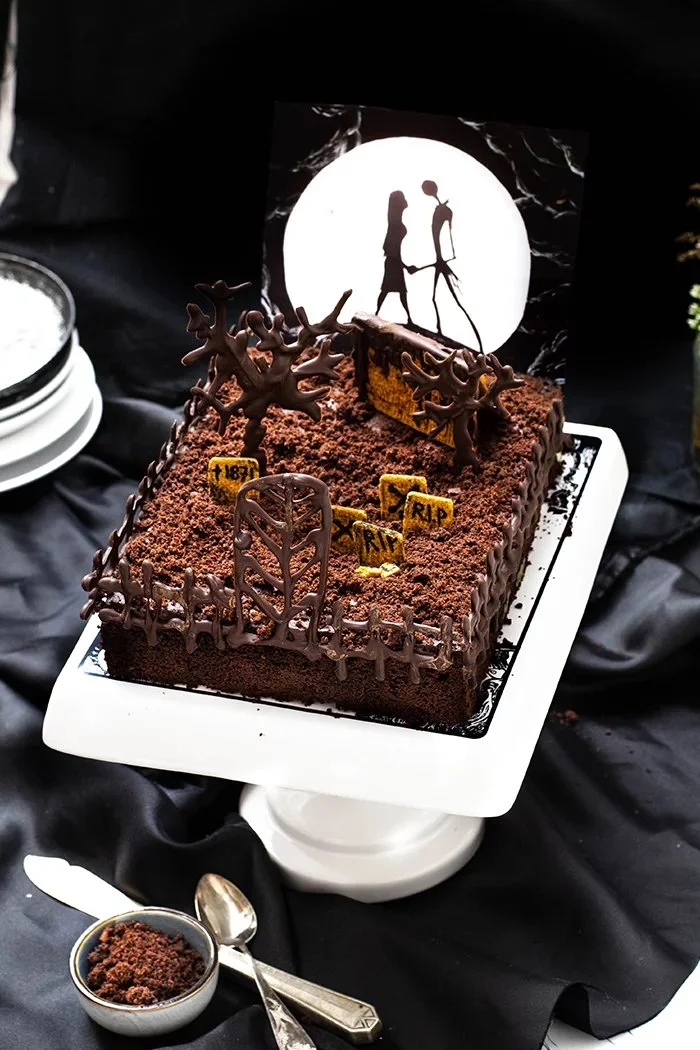
Chocolate Brownie Cemetery is not just any dessert; it’s a fun and spooky treat perfect for Halloween or themed parties. The combination of rich, fudgy brownies with cute decorations makes it a hit with kids and adults alike. Plus, it’s an entertaining project to get everyone involved in decorating, sparking creativity and laughter in the kitchen.
How to Make Chocolate Brownie Cemetery
Ingredients:
- 4 large eggs
- 200 g sugar
- 250 g butter
- 1 tsp vanilla paste
- 150 g flour
- 120 g cocoa powder
- A pinch of salt
- 1 tsp baking powder
- 150 g whole almonds
- 100 g walnuts
- 150 g dark chocolate
- 6 mini Kemmsche cakes
- 2 classic Kemmsche cakes
Directions:
- Preheat the oven to 180°C (356°F).
- For the brownies, beat the eggs with sugar and vanilla paste until creamy. Then mix in the softened butter.
- Add the flour, cocoa powder, salt, and baking powder, and stir everything well.
- Fold in the nuts and pour the batter into a square baking pan lined with parchment paper.
- Bake in the preheated oven for about 20-25 minutes. The brownies should still jiggle when you take them out. Let them cool completely, and if possible, refrigerate them overnight.
- For decoration, melt 120 g of dark chocolate and fill a piping bag with it. On a piece of parchment paper, pipe trees, fences (the same length as the brownie sides), or a gate.
- Assemble two classic Kemmsche cakes together to form a small house. Use melted chocolate to stick them together.
- Decorate the mini Kemmsche cakes with a black food marker, writing phrases like "R.I.P." Let the decorations set in the refrigerator for at least 20 minutes.
- Once cooled, remove the brownies from the pan, trim the edges, and crumble them. Sprinkle the crumbles all over the brownies.
- Melt the remaining 30 g of chocolate and use it to attach the fences and the gate around the edge of the brownie.
- Cut small holes in the brownie and insert the chocolate trees. Optionally, attach a paper horror film scene at the end of the cemetery.
How to Serve Chocolate Brownie Cemetery
Serve the Chocolate Brownie Cemetery on a large platter. You can also add some fun props like fake spiders or small tombstones to enhance the spooky theme. Cut servings into squares and watch your guests delight in this creative and tasty dessert.
How to Store Chocolate Brownie Cemetery
You can store the Chocolate Brownie Cemetery in an airtight container at room temperature for up to four days. If you want to keep it longer, refrigerate it for up to a week. Just be sure to let it come to room temperature before serving for the best taste.
Tips to Make Chocolate Brownie Cemetery
- Use high-quality dark chocolate for the best flavor.
- Make sure not to overbake the brownies, as they should be chewy and fudgy.
- Get creative with the decorations—add skulls or other spooky elements to personalize your cemetery.
Variation
You can vary the nuts used in the brownies. Try adding pecans or using no nuts at all if you prefer a nut-free version. You could also switch up the decorations to match different themes or seasons.
FAQs
Can I make this recipe gluten-free?
Yes! You can substitute the all-purpose flour with a gluten-free flour blend for a gluten-free version.
How can I make this recipe vegan?
Use flax eggs (1 tablespoon of ground flaxseed mixed with 2.5 tablespoons of water for each egg) and replace the butter with vegan butter or coconut oil.
Can I store leftover decorations?
Yes, store any leftover candies or decorations in a cool, dry place to use for later projects.


Leave a comment